


Marcantonio Lab Protocol Manual
Protein Gel
Preparing and Running a Protein Gel (7% Polyacrylamide)
A. Preparation of Running Gel Solution
1) Add to a 50 ml cylinder:
DD-H2O 26 ml
30% acrylamide stock (37.5:1 Acryl/Bis) 10.5 ml
2M Tris 8.8 8.4 ml
20% SDS 0.23 ml
2) Cover with a piece of Parafilm and invert gently to mix.
B. Assembling the Gel Sandwich
1) Clean two glass plates, one small and one large, by THOROUGHLY scrubbing with a non-abrasive detergent and brush. Rinse THOROUGHLY with water and allow to air dry. Also clean and dry two side spacers and a bottom spacer. Be sure to remove all traces of ink, soap, tape, dirt, dust, sweat, lunch, and any other debris that may settle on the plates.
2) Immediately before assembling plates, rinse them with ethanol and dry with a Kimwipe.
3) Place the larger plate on lab paper. Place the side spacers along the short edges of the plate with the foam block face up. Carefully place the smaller plate over this so that the lower edges of the two plates meet and the foam spacer block is snug against the top of the smaller plate..
4) Clamp the gel sandwich together with six clamps, two on each side and two on the bottom.
C. Pouring the Running Gel
1) Before pouring the gel, pipet a small amount of molten 1.2% agarose into each lower corner of the gel sandwich to seal the corners in order to prevent leakage of the gel solution.
2) Add the following reagents to the gel solution:
TEMED 30 ul
10% Ammonium Persulfate 200 ul
Following addition of the APS, cover with a piece of Parafilm and invert to mix the solution.
These reagents catalyze the polymerization of the gel solution. Depending on the precise environmental conditions, you have approximately 5 minutes to pour the gel after the addition of the catalysts.
3) Holding the plates at a slight angle so that the gel will flow down the large plate, carefully pour the gel between the glass plates
4) Pour gel solution until there is about 1.5 to 2 inches of room left at the top of the sandwich.
This is to allow room for pouring the stacking gel.
5) Add 1-2 ml of Isobutanol to the sandwich. This will smooth out the upper surface of the gel and remove any bubbles that may have formed during the mixing and pouring process.
6) Leave the gel sandwich upright to polymerize.
D. Preparation of Stacking Gel Solution
1) Add to a 50 ml beaker:
DD-H2O 14.7 ml
30% acrylamide stock (37.5:1 Acryl/Bis) 2.5 ml
1M Tris 6.8 2.5 ml
20% SDS 0.1 ml
2) Stir with the pipet tip to mix.
E. Pouring the Stacking Gel
1) Pour the isobutanol off the running gel.
2) Rinse the gel by pouring approximately 1/2 inch of stacking gel solution onto the gel and gently rocking the gel sandwich back and forth. Pour the rinse off as waste.
3) Repeat the rinse as above.
4) Add the following reagents to the stacking gel solution:
TEMED 40 ul
10% Ammonium Persulfate 200 ul
Following addition of the APS, stir the solution with a pipet tip to mix.
5) Pour the stacking gel solution into the gel sandwich directly from the beaker. Pour gel solution until it reaches the top of the smaller plate.
6) Gently insert the comb into the gel sandwich, being careful not to form bubbles in the well-spaces.
As the gel polymerizes, it may contract. If this starts to happen, you should add some more stacking gel solution to the corners. Failure to do so may result in the loss of usable wells.
7) Leave the gel sandwich upright to polymerize.
F. Setting Up the Gel
1) Gently remove the comb from the gel sandwich.
2) Remove the spring clips from the bottom and sides of the gel, as well as the bottom spacer.
3) Position the gel sandwich so that the shorter plate faces the apparatus and the foam blocks form a seal with the gasket, and clamp it onto the gel apparatus using spring clips on the sides.
4) Pour 1x Running Buffer into the upper buffer chamber of the gel apparatus and check for leaks. Readjust the gel sandwich and/or spring clips if necessary. 1 liter of 1x Running Buffer will be more than enough for the two chambers of the V16 Apparatus.
5) Use a syringe with a bent needle to blow away any bubbles that formed just beneath the surface of the gel sandwich. Failure to remove these bottom bubbles will result in a real mess.
G. Sample Application and Running the Gel
1) Suspend samples in a suitable volume of gel loading buffer (<80 ul).
2) Heat samples to 95 degrees for 2 minutes just prior to loading gel.
3) Load samples into wells of gel using a pipettor.
4) Connect the leads to the gel apparatus and the power supply and adjust current to 40-50 mAmps for 4 hours OR 10 mAmps to run overnight.
H. Disassembling the Gel
1) Turn off the power supply and disconnect the leads from the apparatus.
2) Pour off the buffer from the upper and lower buffer chambers as waste.
3) Remove the spring clamps from the apparatus and remove the gel sandwich.
4) Remove the side spacers and gently pry the plates apart , being careful not to tear the gel.
I. Fixing the Gel
1) Pour 200 ml of 30% Methanol/10% Acetic Acid into a 500 ml Nalgene storage box. Place gel in this solution and shake gently on a rotator for 1 hour.
At this point, treatment of the gel will depend upon the exact application you are involved in. You may need to soak the gel in ENHANCE, Coomassie Blue, or nothing at all.
See the appropriate protocol for your application.


-
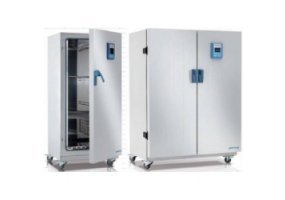
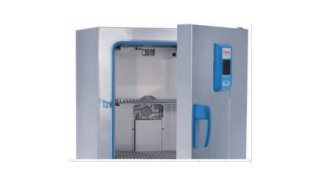
Thermo Scientific Heratherm 大容量高端型烘箱(Thermo Scientific Heratherm Large Capacity Advanced Protocol Ovens)
询底价 -

Thermo Scientific Heratherm 高端安全型烘箱(Thermo Scientific Heratherm Advanced Protocol Security Ovens)
询底价 -
Thermo Scientific Heratherm 高端型烘箱(Thermo Scientific Heratherm Advanced Protocol Ovens)
询底价 -
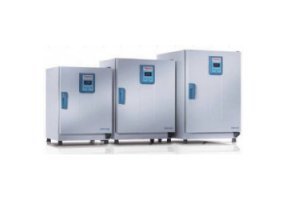
Thermo Scientific Heratherm 通用型烘箱(Thermo Scientific Heratherm General Protocol Ovens)
询底价


