


非变性胶蛋白电泳
Section 2.1
Nondenaturing Polyacrylamide Gel Electrophoresis of Proteins
John M. Walker
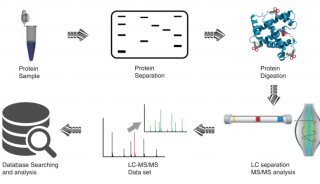
1. Introduction
SDS-PAGE (Section 2.2) is probably the most commonly used gel electrophoretic system for analyzing proteins.
However, it should be stressed that this method separates denatured protein. Sometimes one needs to analyze native,nondenatured proteins, particularly if wanting to identify a protein in the gel by its biological activity (for example, enzyme activity, receptor binding, antibody binding, and so on). On such occasions it is necessary to use a nondenaturing system such as described in this section. For example, when purifying an enzyme, a single major band on a gel would suggest a pure enzyme. However this band could still be a contaminant; the enzyme could be present as a weaker (even nonstaining) band on the same gel. Only by showing that the major band had enzyme activity would you be convinced that this band corresponded to your enzyme. The method described here is based on the gel system first described by Davis ( 1). To enhance resolution a stacking gel can be included (see Section 2.2 for the theory behind the stacking gel system).
2. Materials
1. Stock acrylamide solution: 30 g acrylamide, 0.8 g bis-acrylamide. Make up to 100 mL in distilled water and filter. Stable at 4°C for months (see Note 1). Care: Acrylamide Monomer Is a Neurotoxin. Take care in handling acrylamide (wear gloves) and avoid breathing in acrylamide dust when weighing out.
2. Separating gel buffer: 1.5M Tris-HCl, pH 8.8.
3. Stacking gel buffer: 0.5M Tris-HCl, pH 6.8.
4. 10% Ammonium persulfate in water.
5. N,N,N',N'-tetramethylethylenediamine (TEMED).
6. Sample buffer (5X). Mix the following:
a. 15.5 mL of 1M Tris-HCl pH 6.8;
b. 2.5 mL of a 1% solution of bromophenol blue;
c. 7 mL of water; and
d. 25 mL of glycerol.
Solid samples can be dissolved directly in 1X sample buffer. Samples already in solution should be diluted
accordingly with 5X sample buffer to give a solution that is 1X sample buffer. Do not use protein solutions that are in a strong buffer that is not near to pH 6.8 as it is important that the sample is at the correct pH. For these samples it will be necessary to dialyze against 1X sample buffer.
7. Electrophoresis buffer: Dissolve 3.0 g of Tris base and 14.4 g of glycine in water and adjust the volume to 1 L. The final pH should be 8.3.
8. Protein stain: 0.25 g Coomassie brilliant blue R250 (or PAGE blue 83), 125 mL methanol, 25 mL glacial acetic
acid, and 100 mL water. Dissolve the dye in the methanol component first, then add the acid and water. Dye
solubility is a problem if a different order is used. Filter the solution if you are concerned about dye solubility. For
best results do not reuse the stain.
9. Destaining solution: 100 mL methanol, 100 mL glacial acetic acid, and 800 mL water.
10. A microsyringe for loading samples.
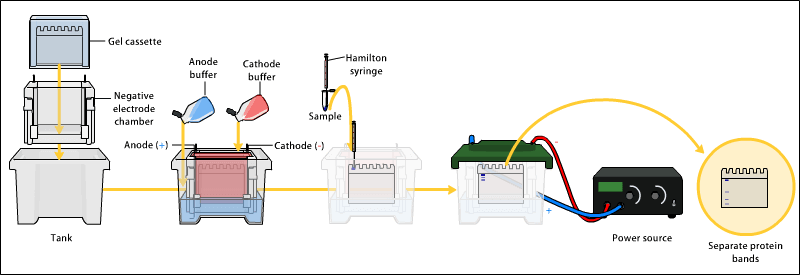
3. Method
1. Set up the gel cassette.
2. To prepare the separating gel (see Note 2) mix the following in a Buchner flask: 7.5 mL stock acrylamide solution, 7.5 mL separating gel buffer, 14.85 mL water, and 150 mL 10% ammonium persulfate. "Degas" this solution under vacuum for about 30 s. This degassing step is necessary to remove dissolved air from the solution, since oxygen can inhibit the polymerization step. Also, if the solution has not been degassed to some extent, bubbles can form in the gel during polymerization, which will ruin the gel. Bubble formation is more of a
problem in the higher percentage gels where more heat is liberated during polymerization.
3. Add 15 mL of TEMED and gently swirl the flask to ensure even mixing. The addition of TEMED will initiate the polymerization reaction, and although it will take about 20 min for the gel to set, this time can vary depending on room temperature, so it is advisable to work fairly quickly at this stage.
4. Using a Pasteur (or larger) pipet, transfer the separating gel mixture to the gel cassette by running the solution
carefully down one edge between the glass plates. Continue adding this solution until it reaches a position 1 cm from the bottom of the sample loading comb.
5. To ensure that the gel sets with a smooth surface, very carefully run distilled water down one edge into the cassette using a Pasteur pipet. Because of the great difference in density between the water and the gel solution, the water will spread across the surface of the gel without serious mixing. Continue adding water until a layer about 2 mm exists on top of the gel solution.
6. The gel can now be left to set. When set, a very clear refractive index change can be seen between the polymerized gel and overlaying water.
7. While the separating gel is setting, prepare the following stacking gel solution. Mix the following quantities in a
Buchner flask: 1.5 mL stock acrylamide solution, 3.0 mL stacking gel buffer, 7.4 mL water, and 100 mL 10%
ammonium persulfate. Degas this solution as before.
8. When the separating gel has set, pour off the overlaying water. Add 15 mL of TEMED to the stacking gel solution and use some (~2 mL) of this solution to wash the surface of the polymerized gel. Discard this wash, then add the stacking gel solution to the gel cassette until the solution reaches the cutaway edge of the gel plate. Place the well-forming comb into this solution and leave to set. This will take about 30 min. Refractive index changes around the comb indicate that the gel has set. It is useful at this stage to mark the positions of the bottoms of the wells on the glass plates with a marker pen.
9. Carefully remove the comb from the stacking gel, remove any spacer from the bottom of the gel cassette, and
assemble the cassette in the electrophoresis tank. Fill the top reservoir with electrophoresis buffer ensuring that the buffer fully fills the sample loading wells, and look for any leaks from the top tank. If there are no leaks, fill the bottom tank with electrophoresis buffer, then tilt the apparatus to dispel any bubbles caught under the gel.
10. Samples can now be loaded onto the gel. Place the syringe needle through the buffer and locate it just above the bottom of the well. Slowly deliver the sample (~5-20 mL) into the well. The dense sample solvent ensures that the sample settles to the bottom of the loading well. Continue in this way to fill all the wells with unknowns or
standards, and record the samples loaded.
11. The power pack is now connected to the apparatus and a current of 20-25 mA passed through the gel (constant
current) (see Note 3). Ensure that the electrodes are arranged so that the proteins are running to the anode (see Note 4). In the first few minutes the samples will be seen to concentrate as a sharp band as it moves through the stacking gel. (It is actually the bromophenol blue that one is observing, not the protein but, of course, the protein is stacking in the same way.) Continue electrophoresis until the bromophenol blue reaches the bottom of the gel. This will usually take about 3 h. Electrophoresis can now be stopped and the gel removed from the cassette. Remove the stacking gel and immerse the separating gel in stain solution, or proceed to step 13 if you wish to detect enzyme activity (see Notes 5 and 6).
12. Staining should be carried out, with shaking, for a minimum of 2 h and preferably overnight. When the stain is
replaced with destain, stronger bands will be immediately apparent and weaker bands will appear as the gel destains.Destaining can be speeded up by using a foam bung, such as those used in microbiological flasks. Place the bung in the destain and squeeze it a few times to expel air bubbles and ensure the bung is fully wetted. The bung rapidly absorbs dye, thus speeding up the destaining process.
13. If proteins are to be detected by their biological activity, duplicate samples should be run. One set of samples should be stained for protein and the other set for activity. Most commonly one would be looking for enzyme activity in the gel. This is achieved by washing the gel in an appropriate enzyme substrate solution that results in a colored product appearing in the gel at the site of the enzyme activity (see Note 7).
4. Notes
1. The stock acrylamide used here is the same as used for SDS gels (see Section 2.2) and may already be availabe in your laboratory.
2. The system described here is for a 7.5% acrylamide gel, which was originally described for the separation of serum proteins (1). Since separation in this system depends on both the native charge on the protein and separation according to size owing to frictional drag as the proteins move through the gel, it is not possible to predict the electrophoretic behavior of a given protein the way that one can on an SDS gel, where separation is based on size alone. A 7.5% gel is a good starting point for unknown proteins. Proteins of mol wt >100,000 should be separated in 3-5% gels. Gels in the range 5-10% will separate proteins in the range 20,000-150,000, and 10-15% gels will separate proteins in the range 10,000-80,000. The separation of smaller polypeptides is described in Section 2.7. To alter the acrylamide concentration, adjust the volume of stock acrylamide solution in Subheading 3., step 2 accordingly, and increase/decrease the water component to allow for the change in volume. For example, to make a 5% gel change the stock acrylamide to 5 mL and increase the water to 17.35 mL. The final volume is still 30 mL, so 5 mL of the 30% stock acrylamide solution has been diluted in 30 mL to give a 5% acrylamide solution.
3. Because one is separating native proteins, it is important that the gel does not heat up too much, since this could
denature the protein in the gel. It is advisable therefore to run the gel in the cold room, or to circulate the buffer
through a cooling coil in ice. (Many gel apparatus are designed such that the electrode buffer cools the gel plates.) If heating is thought to be a problem it is also worthwhile to try running the gel at a lower current for a longer time.
4. This separating gel system is run at pH 8.8. At this pH most proteins will have a negative charge and will run to the anode. However, it must be noted that any basic proteins will migrate in the opposite direction and will be lost from the gel. Basic proteins are best analyzed under acid conditions, as described in Sections 2.5 and 2.6.
5. It is important to note that concentration in the stacking gel may cause aggregation and precipitation of proteins.
Also, the pH of the stacking gel (pH 6.8) may affect the activity of the protein of interest. If this is thought to be a
problem (e.g., the protein cannot be detected on the gel), prepare the gel without a stacking gel. Resolution of
proteins will not be quite so good, but will be sufficient for most uses.
6. If the buffer system described here is unsuitable (e.g., the protein of interest does not electrophorese into the gel
because it has the incorrect charge, or precipitates in the buffer, or the buffer is incompatible with your detection
system) then one can try different buffer systems (without a stacking gel). A comprehensive list of alternative buffer systems has been published (2).
7. The most convenient substrates for detecting enzymes in gels are small molecules that freely diffuse into the gel and are converted by the enzyme to a colored or fluorescent product within the gel. However, for many enzymes such convenient substrates do not exist, and it is necessary to design a linked assay where one includes an enzyme
together with the substrate such that the products of the enzymatic reaction of interest is converted to a detectable
product by the enzyme included with the substrate. Such linked assays may require the use of up to two or three
enzymes and substrates to produce a detectable product. In these cases the product is usually formed on the urface
of the gel because the coupling enzymes cannot easily diffuse into the gel. In this case the zymogram technique is
used where the substrate mix is added to a cooled (but not solidified) solution of agarose (1%) in the appropriate
buffer. This is quickly poured over the solid gel where it quickly sets on the gel. The product of the enzyme assay is therefore formed at the gel-gel interface and does not get washed away. A number of review articles have been
published which described methods for detecting enzymes in gels (3-7). A very useful list also appears as an
appendix in ref. 8.
References
1. Davis, B. J. (1964) Disc electrophoresis II¾method and application to human serum proteins. Ann. NY Acad. Sci. 121, 404-427.
2. Andrews, A. T. (1986) Electrophoresis: Theory, Techniques, and Biochem-ical and Clinical Applications.
Clarendon, Oxford, UK.
3. Shaw, C. R. and Prasad, R. (1970) Gel electrophoresis of enzymes¾a compilation of recipes. Biochem. Genet. 4, 297-320.
4. Shaw, C. R. and Koen, A. L. (1968) Starch gel zone electrophoresis of enzymes, in Chromatographic and
Electrophoretic Techniques, vol. 2 (Smith, I., ed.), Heinemann, London, pp. 332-359.
5. Harris, H. and Hopkinson, D. A. (eds.) (1976) Handbook of Enzyme Electrophoresis in Human Genetics.
North-Holland, Amsterdam.
6. Gabriel, O. (1971) Locating enymes on gels, in Methods in Enzymology, vol. 22 (Colowick, S. P. and Kaplan, N. O., eds.), Academic, New York, p. 578.
7. Gabriel, O. and Gersten, D. M. (1992) Staining for enzymatic activity after gel electrophoresis. I. Analyt. Biochem. 203, 1-21.
8. Hames, B. D. and Rickwood, D. (1990) Gel Electrophoresis of Proteins, 2nd ed., IRL, Oxford and Washington.